Creating an effective landing page in SAP Analytics Cloud (SAC) is crucial for providing users with a clear entry point to their analytics projects. The landing page serves as the gateway to your SAC environment, offering an overview of the project and seamless navigation to various components. This guide will walk you through the process of designing and setting up a landing page that enhances user experience and streamlines navigation.
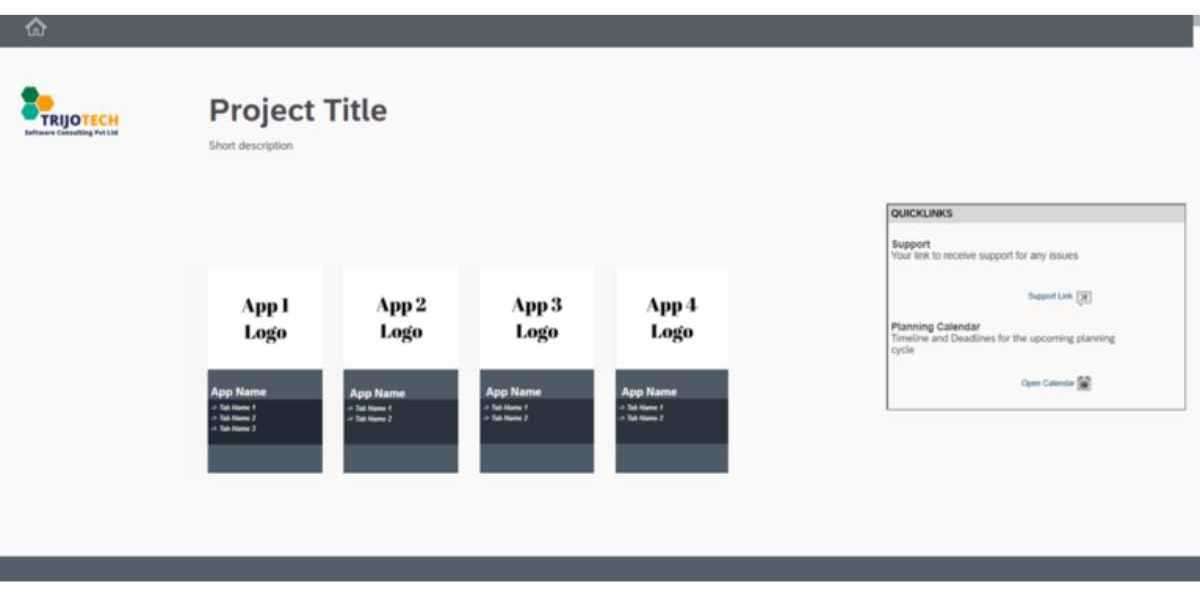
A landing page in SAC is designed to give users an initial impression of the project while providing easy access to different sections. It typically includes a header, main content area, and footer. The header might feature a logo, search bar, and navigation buttons, while the footer could include links to social media, support resources, and legal disclaimers. The main canvas of the landing page is where you can place elements such as the project title, description, and icons linking to other applications or stories within SAC.
To start setting up your landing page, you'll first need to create a layout that suits your needs. Begin by designing the header and footer. The header often includes essential elements like the company logo and navigation buttons. You can use a flow layout panel to arrange these components efficiently. A flow layout panel helps in positioning widgets either vertically or horizontally, ensuring a responsive design that adjusts to different screen sizes. For instance, you might create a "main" flow layout panel and then add additional panels within it to organize your navigation buttons and other elements.
To enhance the visual appeal and usability of your landing page, consider adding space or gaps between different panels. This can be achieved by inserting intermediate panels specifically designated as gap panels. Such a layout improves the overall presentation and ensures that widgets do not overlap or appear misaligned.
Once the layout is in place, focus on customizing the content of the panels. For example, add a panel for the company logo and another for a project description. Customize these panels with appropriate text, fonts, and colors to match your branding and ensure a professional appearance. After customizing the panels, you can proceed to integrate navigation buttons that direct users to different sections of the project.
There are two primary methods for adding links to these navigation buttons: static and dynamic. Static links are fixed URLs that direct users to a specific destination. To add a static link, simply click on the panel where you want to add the link, select the option to add a hyperlink, and paste the URL.
Dynamic links, on the other hand, are generated based on user interactions or other factors. These links are particularly useful when URLs change frequently or when you need to pass parameters to the destination page. SAC provides a standard function called “NavigationUtils.openApplication()” for creating dynamic links. This function allows you to specify parameters such as the application ID and any additional context information. For example, you might use the function like this:
```javascript
NavigationUtils.openApplication("appid", [UrlParameter.create('mode', 'embed'), UrlParameter.create('bookmarkId', 'DEFAULT')], false);
```
In this script, “appid” represents the unique identifier for the application, and URL parameters like ‘mode’ and ‘bookmarkId’ are used to pass context to the destination page. The Boolean value at the end determines whether the link opens in a new tab or the current one.
After setting up the navigation buttons, the next step is to create a header and footer for your landing page. This can be done by adding sub-panels to your main flow layout panel. For instance, you might create a toolbar in the header by adding a sub-panel and placing controls like buttons or icons within it. Similarly, the footer can be designed to include support links and additional resources.
Finally, consider adding quick links to resources such as user guides, forums, and support tickets. These can be incorporated using button widgets with hyperlinks, ensuring that users have easy access to help and additional information.
In summary, creating a landing page in SAP Analytics Cloud involves designing a clear and navigable entry point to your project. By using flow layout panels, customizing content, and integrating navigation buttons with static or dynamic links, you can build a landing page that enhances user experience and facilitates smooth navigation within SAC. This well-designed entry point not only improves the accessibility of your analytics applications but also contributes to a more organized and efficient workflow.